Sunday, June 8, 2014

Cheesy Onion Rice with Bacon Wrapped Chicken (gluten free)

Cheesy Onion Rice
2 cups brown rice
1/2 onion, sliced
1/2 cup grated gruyere cheese
Add rice and water to a pot according to package directions. Bring to a boil and reduce to low. Let cook for 30-45 minutes. Cook onions with butter on med-low heat for about 15 minutes, stirring every few minutes, until caramelized.  Add onions and cheese to rice 10 minutes before it's finished and mix in. 

Bacon Wrapped Chicken
Chicken tenders
Bacon
Thyme
Wrap bacon around chicken and place in baking dish. Sprinkle with thyme. Cook on 350 and flip after 10 minutes. After this side is cooked through, about another 10 minutes, turn the oven to broil. Cook each side until the bacon starts to crisp up, about 5 minutes each side.

Wednesday, January 22, 2014

Hummus Chicken with Mexican Fried Rice (Gluten Free)

The last time I went grocery shopping they were giving samples of some organic hummus and, of course, I had to try some. While I was trying it she was giving me the whole bit about all the things I could do with it(Superbowl snacks, ha! Yeah right, like I watch football) and she mentioned coating chicken in hummus and then baking it to make a crunchy texture on it. I had never even thought of doing this before, so I decided I had to!
I got a spicy green chile version of the hummus and have been trying to come up with something fun to go along with it. It magically came to me when I got home today, Mexican Fried Rice. Yum.

Hummus Chicken

2 chicken breasts
Hummus(any variety, I used green chile)
1/4 cup finely chopped onions

Coat chicken liberally with hummus, and top with chopped onions. Bake in oven at 350. Flip after about 30 mins. After about another 15 minutes(make sure it's cooked through!), flip again and turn on broil to crisp, about 5-10 minutes.

Mexican Fried Rice

2 cups jasmine rice
4 cups chicken broth
1/4 cup onions, chopped
1/2 red bell pepper, chopped
1 jalepeno
2 cloves garlic
Cilantro

Cook rice with the chicken broth. In a separate pan, saute onions in butter. When they start to turn golden, add the rest of the vegetables(minus the cilantro) and saute for a few minutes. When the rice is cooked through, about 20 minutes, add it to the pan with the vegis. Add a few more tablespoons of butter and fry in the pan for a few minutes. Garnish with chopped cilantro.

Sunday, January 19, 2014

Mexican Breakfast Quiche (Gluten Free)

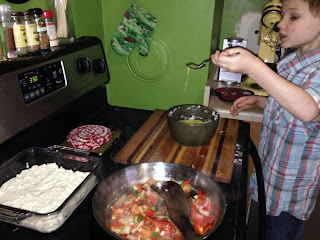
It's been a long time since I have posted a recipe! I keep thinking I need to post recipes, and then I forget to take pictures because I eat my food too fast;) But this weekend I have been having my children help me cook, and I never forget to take pictures of them. So while I do not have a picture of the finished product, I sure do have pictures of my son helping me!
My son is going through a picky eating phase and is constantly telling me my food is disgusting, even though everyone else in the house enjoys it and it is food he has liked in the past. So I decided I would have him help me make breakfast this morning. When you help cook and see the whole process, you have an ownership of your food and know what's in it, and what child is going to say that their creation is disgusting? I'm almost positive he would have "hated" this food had he not helped me make it.
This is actually a recipe that came soley out of my head. I made a cornbread/quiche like creation a couple months ago and was thinking about it in bed before waking up, and thought I would attempt something similar since our last grocery trip had brought back cilantro and jalepenos. The result was delicious:)

Mexican Breakfast Quiche

2 cups Masa flour
3 cups water (about)
1 jalepeno, chopped
1 tomato, chopped with juices squeezed out
1/4 red bell pepper, chopped
1/4 cup onion, chopped
5 cloves garlic, minced
3 strips bacon, chopped
Cilantro
Handful of Spinach
8 eggs

Grease the bottom of a square baking dish. Mix Masa with enough water to make into a thick paste and spread on the bottom of the pan.

Cook bacon in a pan for a few minutes, add onion and continue cooking until onion starts to cook through. Add jalepeno, bell pepper, tomato and garlic and continue cooking. Season with salt, red pepper flakes, and cumin.

Beat the eggs and add cilantro ripped into pieces. Pour half of the mixture over the Masa. Add cooked vegetable mixture and then top with spincach and then cover with rest of the eggs.

Cook in oven at 350 for about 45 minutes.


Sunday, September 8, 2013

Strawberry Crisp-Gluten Free

I have bee meaning to write his post since July, but my summer has been so busy I just never got around to it! I feel like things are finally just starting to slow and call down. Thank god for autumn!
Anyway, way back in July, we went strawberry picking with my in laws for the second year in a row. We tried out a new place this year, last year we went to Greenbluff and this year we did Carver Farms. Both places were nice, but we got way more for our money at Carvers. We got three boxes full for under 30 dollars and then spent several hours freezing them all when we got home. 
We have used them for lots of things, but mostly I've been making a crisp based off a recipe my mother in law sent me after our picking adventure. I never follow a recipe true to form, and I make it different every time, but man is it good! 
The original recipe was for strawberry rhubarb crisp, but we don't have rhubarb and I've never been incredibly fond of it anyway. I have added a chopped up pear to my recipe instead a few times, but mostly just used strawberries. It calls for orange zest and juice, but on accident I used a grapefruit once(I hate grapefruit) and I'm not gonna lie, it was really good. My family even preferred the grapefruit version because the flavor wasn't as potent as the orange is. Anyway, my point is, be creative:) 

Strawberry Crisp

FILLING:
Strawberries-enough to fill the bottom of a square glass baking dish, around 3 cups
Orange-use zest to taste and all the juice
1/2 cup honey
1/2 cup tapioca flour
TOPPING:
1 cup oats(we buy gluten free oats, don't use instant or quick cooking)
1/2 cup coconut flour
1/4 cup chopped almonds
1/4 cup brown sugar
1/2 cube of butter in slices 

Mix strawberries, orange juice, zest, honey and flour in the bottom of a baking dish. 
Combine all topping ingredients EXCEPT butter. Add on top of strawberry mixture and then put the slivers of butter on top of that. 
Bake in oven at 350 for about an hour. Filling should be bubbling and topping should be golden brown. 

Monday, July 15, 2013

Butternut Squash Risotto(Gluten Free)

So here is another recipe that I have been making for years but have yet to post on here! It's one of my daughters favorites, and almost every time I ask her what she wants for dinner she says, "risotto." I found it after randomly searching Google for a recipe to use butternut squash for, and now risotto is also one of my favorite things to eat. If I go to a restaurant and risotto is on the menu, it's a near guarantee I will order it.
For those of you who haven't had risotto before, it's a rice dish made from arborio rice, but is made a little bit different so that it is very creamy and saucy. Don't try to rush it when cooking this recipe, it's a slow process in which you will be at the stove for an hour without much leaving. Trust me when I say it's worth it. And, hey, it uses wine, so pour a glass for yourself before starting and it will make the cooking process that much more enjoyable!
Note: Using drinking wine rather than cooking wine WILL make your food taste better. If you wouldn't drink it, why would you eat it? Trust me, spend the extra money and get a bottle of normal wine.


Butternut Squash Risotto

 2 cups arborio rice
1 1/2-2 boxes chicken broth(about 6 cups)
1/2 cup white wine
2 shallots, chopped
2 ounces pancetta, chopped
1 cup shredded parmesan cheese
1 butternut squash
Oil
Salt

Peel and cube the butternut squash and put it into a baking dish and cover with oil. Put in the oven at 350. It will stay in the oven until the risotto is done, but will need to be stirred occasionally. You can sprinkle a bit of salt on it halfway through.

In a large pot, melt butter and add the shallots. Cook for a few minutes and then add the pancetta. Continue to cook for another few minutes and then add the rice. Coat the rice in the butter and then pour the wine over it and stir. When the wine has absorbed, add about 1/2-1 cup of broth. Stir and when the liquid is absorbed, add another 1/2-1 cup of broth. You will continue this process of add small amounts of broth, stirring, and waiting for the liquid to absorb before adding more until the mixture begins to look creamy and it seems like the liquid is not absorbing as much. At this point, add the cheese and mix it in until well combined.

You can either mix the butternut squash into the risotto, or serve on top.

This is the link to the original recipe, and I have stayed mostly true to it. However, it calls for saffron, which is a pretty pricy spice, and I think that it tastes fine without it, so I have never used it. Also, in her recipe, she heats the broth in another pan so that as she is adding it, it is already hot. This may make the risotto better, but I have never felt like dirtying extra pans that I don't need to(I hate doing dishes) and I feel like the risotto is just fine using room temperature broth.

Saturday, July 6, 2013

Chickpea Patties

I can't believe I have never posted this recipe before, it's one of my favorites. And on top of that, a friend of mine specifically asked me for the recipe a couple months ago and I made them soon thereafter, but forgot to take a picture. So this one is for you, Shannon!
I'm not a vegetarian by any means, but I definitely try to eat vegetarian meals regularly because they can be so healthy for you. I seem to do it more often in the summer, too. Something about that hot weather just begs for salads and non-meat food. Unless you are craving a steak... But that wasn't today;)
I usually serve this meal with rice or lettuce. Today I did both. The original recipe called for it to be served on an arugula salad, but I'm not particularly fond of arugula.
The original recipe calls for cashew cream, but I have no idea what that is and cannot find it anywhere, so I use cashew butter instead, or almond butter or peanut butter depending on what I have on hand.The nutritional yeast flakes can be found in the bulk bins in the organic section of the grocery store, or a whole foods store if your normal grocery store doesn't carry it. The same goes for the garbanzo bean flour. I buy Bob's Red Mill flour in a bag, but it can also be found bulk. Depending on what part of the country you are from, they will either be called chick peas or garbanzo beans, but the original recipe referred to them as chickpea patties, and the name is catchy, so that's how I refer to it, even though you can't find a "chickpea" anywhere here;)
I found this recipe off another site, and I'm almost positive it was somewhere from Treehugger, but for the life of me, I can't find it anymore. So here is how I make it now, roughly, because it changes a little bit each time;)

Chickpea Patties

2 cans chickpeas(garbanzo beans)
1 red bell pepper, chopped
1/4 onion, chopped
3-4 cloves of garlic, chopped
Red Pepper Flakes to taste
1/4 cup nutritional yeast flakes
1/4 cup cashew butter(or almond, or peanut)
1/2 cup garbanzo bean flour
Salt and Pepper to taste

Saute the onions with some butter or oil for a few minutes, then add the bell pepper, garlic, and red pepper flakes. Cook on a low heat for about 10 minutes until the onion is starting to begin to caramelize. The longer you cook, the better it will taste. Stir often so it doesn't burn.
While this is cooking, use a fork/potato masher/food processor to mash up the garbanzo beans. Ideally you still want it a little chunky, not pasty. Add the nutritional yeast flakes, cashew butter, and salt and pepper.
When the onion mixture is ready, add it to the garbanzo bean mixture and combine well. Using your hands, form the mixture into patties and coat them in the flour along with salt and pepper.
The patties can be pan fried in butter/oil, or baked in a casserole dish in the oven/bbq at about 350. Flip after a few minutes of frying, or 5-10 minutes in the oven. Let the other side cook and then serve!

Thursday, July 4, 2013

Quinoa and Summer Squash Salad!

I love Poor Girl Eats Well recipes, and she has tons of great recipes for fresh, summer salads with ingredients I would have never thought to use. This one in particular I made for the first time last summer. I happened to have some squash sitting around in my fridge waiting to be used and this was the recipe that came to mind.
When I pulled the recipe up, I was worried I wouldn't be able to make it because it called for black beans, and I never keep cans of beans on hand, only dry. Thankfully, I had some cooked black eyed peas in my freezer that I was able to thaw out instead. And instead of red onions, I used green onions, because that is what I had on hand.

My kids wanted to join in on the cooking today, and the past couple times they have helped me they have really enjoyed it. I even let them use the knife to help me cut the squash. It's important to me that my kids learn the joy of cooking and want to cook with real, healthy ingredients when they are adults. This is a hard task with our tiny kitchen, but the more we do it, the easier it becomes.

Here is the link to the recipe: Poor Girl Eats Well Quinoa, Black Bean & Summer Squash Salad. I seriously recommend liking her page on Facebook or subscribing to her blog for lots of great recipes!